Index of Posts
Checkboxes in forms for Rails
February 13, 2016
Imagine we are creating a web application to help a conference coordinator organize and confirm which attendees will attend which sessions. This can be completed in Rails using collection select boxes.
Defining the Models
Let’s first create the models and associations between sessions and attendees.
1
2
3
4
class Session < ActiveRecord::Base
has_many :session_attendees
has_many :attendees, through: :session_attendees
end
1
2
3
4
class Attendee < ActiveRecord::Base
has_many :session_attendees
has_many :sessions, through: :session_attendees
end
We’ll next create the join model that associates sessions with attendees.
1
2
3
4
class SessionAttendee < ActiveRecord::Base
belongs_to :session
belongs_to :attendee
end
We can now establish that each session has many attendees and every attendee can have many sessions.
Generate the Form
Our coordinator wants to view a page that will create a new session and record all the attendees for that particular session. Assuming that the attendees’ information has already been entered into the database, we will list all of them on the page with checkboxes using the form_for helper method to create a form.
1
2
3
4
5
6
7
8
<%= form_for @session do |f| %>
<%= f.label :name %>
<%= f.text_field :name %>
<%= f.label :scheduled_time %>
<%= f.text_area :scheduled_time %>
<%= f.collection_check_boxes :attendee_ids, Attendee.all, :id, :name %>
<%= f.submit %>
<% end %>
Let’s examine the colleciton_check_boxes method a little closer and the params that we are passing into it.
:attendee_ids: the collection of all attendee_ids that will be passed in if the particular checkbox is marked
Attendee.all: the collection of all possible checkbox options that will be displayed on the form
:id: the parameter of an attendee that will be passed into the attendee_ids collection
:name: the attribute of the attendee that will be visible next to the checkbox
The form will be rendered in HTML as:
1
2
3
4
5
<input type="checkbox" value="1" name="session[attendee_ids][]" id="session_attendee_ids_1" />
<label for="session_attendee_ids_1">Mr. Peabody</label>
<input type="checkbox" value="2" name="session[attendee_ids][]" id="session_attendee_ids_2" />
<label for="session_attendee_ids_2">Sherman</label>
<input type="hidden" name="session[attendee_ids][]" value="" />
Notice that a hidden input field is created, so that all the checkboxes can be left unchecked. After clicking submit, the params will be passed to the controller as a nested hash:
{:session => {:attendee_ids => ["1", "2", ""]}} Which brings us to the final step.
Whitelist the params in the Controller
To prevent CSRF attacks, we will add attendee_ids to the permitted params. Note: to permit a params attribute defined with an array, we must pass it in with an empty array:
params.require(:session).permit(:name, :scheduled_time, attendee_ids:[])Our convention coordinator is now satisfied with a form that will create a new session and record all attendees who are well, attending.
Creating a CRUD app
February 5, 2016
A full-fledged CRUD application that utilizes RESTful routes is a major undertaking made easier with Ruby frameworks like Sinatra. This domain model creates users with authentication capabilities, so they can create causes that are categorized. Let’s walk through the process to see what composes a CRUD app.
File Structure
An overview of the necessary files:
└── fundmycause
    ├── Gemfile
    ├── Gemfile.lock
    ├── README.md
    ├── Rakefile
    ├── app
    │   ├── controllers
    │   │   ├── application_controller.rb
    │   │   ├── categories_controller.rb
    │   │   ├── causes_controller.rb
    │   │   └── users_controller.rb
    │   ├── models
    │   │   ├── category.rb
    │   │   ├── cause.rb
    │   │   ├── user.rb
    │   │   └── usercause.rb
    │   └── views
    │       ├── categories
    │       │   └── index.erb
    │       ├── causes
    │       │   ├── edit.erb
    │       │   ├── index.erb
    │       │   ├── new.erb
    │       │   └── show.erb
    │       ├── index.erb
    │       ├── layout.erb
    │       └── users
    │           ├── login.erb
    │           ├── new.erb
    │           └── show.erb
    ├── config
    │   └── environment.rb
    ├── config.ru
    ├── db
    │   └── schema.rb
    └── public
        └── stylesheets
            └── index.css
Gemfile
Explore the Gemfile to see the relevant gems that this gem will require. Particular to this app is the bcrypt gem. This will store the user-created password by ‘salting’ in random characters.
Models
This app creates three models: a User, a Cause, and a Category. In creating the migrations, note the following associations:
- a `User` has many `Causes`
- a `Cause` has many `Users`
- a `Cause` belongs to a `Category`
- a `Category` has many `Causes`
User Authentication
To add authentication to the app, the two helper methods logged_in? and current_user will be utilized to check user credentials before accessing certain pages. These methods will prevent users from editing and deleting other users’ causes as well as restricting access to only their own causes.
CRUD: Create a Cause
1
2
3
4
5
6
7
8
9
10
11
12
13
14
15
16
17
18
19
20
21
22
23
24
25
26
27
28
29
30
class CausesController < ApplicationController
get '/causes/new' do
if logged_in?
erb :"causes/new"
else
redirect to '/login'
end
end
post '/causes/new' do
@user = current_user
@cause = Cause.new(name: params[:cause][:name])
@cause.created_by_user = @user.id
@cause.description = params[:cause][:description]
@cause.funding = params[:cause][:funding]
if params[:cause][:category_id]
@cause.category_id = params[:cause][:category_id]
else
@cause.category = Category.find_or_create_by(name: params[:new_category].capitalize)
end
if @cause.save
@cause.users << @user if !@cause.users.include?(@user)
redirect to "/causes"
else
erb :"causes/new", locals: {message: "The cause wasn't created."}
end
end
end
The first few routes will create the form and process the form input to create a new Cause. The different attributes of the Cause (like name, description, created by the user, and funding) will be defined with values from the form submission. The user will also have an option to choose from an existing Category or create a new Category to associate with the Cause.
To accomplish this, the POST method on the create action will utilize a conditional statement to check if a particular category checkbox has been marked. If not, a new Category will be created and associated with the new Cause with the value from the form input for a new category.
Finally, if the new Cause can be saved to the database, the current_user will be associated with the Cause so that the “creator” of the cause will be defined and makes it easier to formulate the restricted edit and delete actions.
CRUD: Read a Cause
1
2
3
4
5
6
7
8
9
10
11
get '/causes' do
@causes = Cause.all
@categories = Category.all
erb :"causes/index"
end
get '/cause/:id' do
@cause = Cause.find_by(id: params[:id])
@user = current_user if logged_in?
erb :"causes/show"
end
In order to view a list of all causes and detailed information on each cause, the index and show routes and view pages must be created. On the show page, there is a conditional that will be implemented to check if the user is logged_in? and whether or not the cause’s first user is equal to the current_user.
In essence, this checks to see if the cause’s creator is the current user. If it is, it will present the user with an option to delete the cause. If not, it will have an option for the user to join the cause. In order to see the routes and code associated with joining/removing a user from a cause, view the code at fundmycause.
CRUD: Edit a Cause
1
2
3
4
5
6
7
8
9
10
11
12
13
14
15
16
17
18
19
20
21
22
23
24
25
26
27
28
29
30
31
get '/cause/:id/edit' do
if logged_in?
@user = current_user
@cause = Cause.find_by(id: params[:id])
if @cause.created_by_user == @user.id
erb :"causes/edit"
else
redirect to '/causes'
end
else
redirect to '/causes'
end
end
patch '/cause/:id/edit' do
@cause = Cause.find_by(id: params[:id])
@cause.name = params[:cause][:name]
@cause.description = params[:cause][:description]
@cause.funding = params[:cause][:funding]
if params[:cause][:category_id]
@cause.category_id = params[:cause][:category_id]
else
@cause.category = Category.find_or_create_by(name: params[:new_category].capitalize)
end
if @cause.save
redirect to "/cause/#{@cause.id}"
else
erb :"causes/show", locals: {message: "The cause wasn't updated."}
end
end
Before the edit cause page is loaded, the user will be authenticated with the logged_in? helper method. After authentication, there will be a conditional statement to check if the cause’s first user (a.k.a. the creator) is the current_user. If so, the page for editing a Cause will load and produce a form simliar to the “create a new cause” view page.
Upon form submission, the information stored in the params hash will be used to update the cause. Similar to the create action, the PATCH method on the edit action invokes a conditional statement that potentially assigns a different category - by choosing from available ones or creating a new one.
A note on the PATCH method: By utilizing the MethodOverride class available through Rack, the HTTP POST request method is overridden by the value of the _method parameter located in the form.
CRUD: Delete a Cause
1
2
3
4
5
6
7
8
9
10
11
12
13
14
delete '/cause/:id/delete' do
if logged_in?
@user = current_user
@cause = Cause.find_by(id: params[:id])
if @cause.created_by_user == @user.id
@cause.destroy
erb :"users/show", locals: {message: "The cause was deleted."}
else
redirect to '/causes'
end
else
redirect to '/causes'
end
end
Similar to the edit action, the delete action will authenticate the user and confirm with a conditional statement that the cause’s first user (the cause creator) is the current_user. With that authentication, the delete action will display as a button on the show view page and successfully delete the cause.
Also similar to the edit action, the MethodOverride class is utilized to turn the POST request into a DELETE request.
Summary
This domain model utilized the MVC framework and CRUD actions to develop routes and view pages that associate Users with Causes and Causes with Categories. By examining each component of a CRUD application, we are able to see how RESTful routes are beneficial and efficient in allowing easy data creation and manipulation.
See the entire project on GitHub: fundmycause
Progress Report
January 27, 2016
Remember that commercial - ‘How many licks does it take to get to the center of a Tootsie Roll Pop?’
I think learning to code serves up the same philosophical challenge. Recently, I find myself asking the question, how much do I really know about programming? How much more do I have to learn to become a decent web developer?
That’s when I came across this interesting chart created by the Viking Code School:
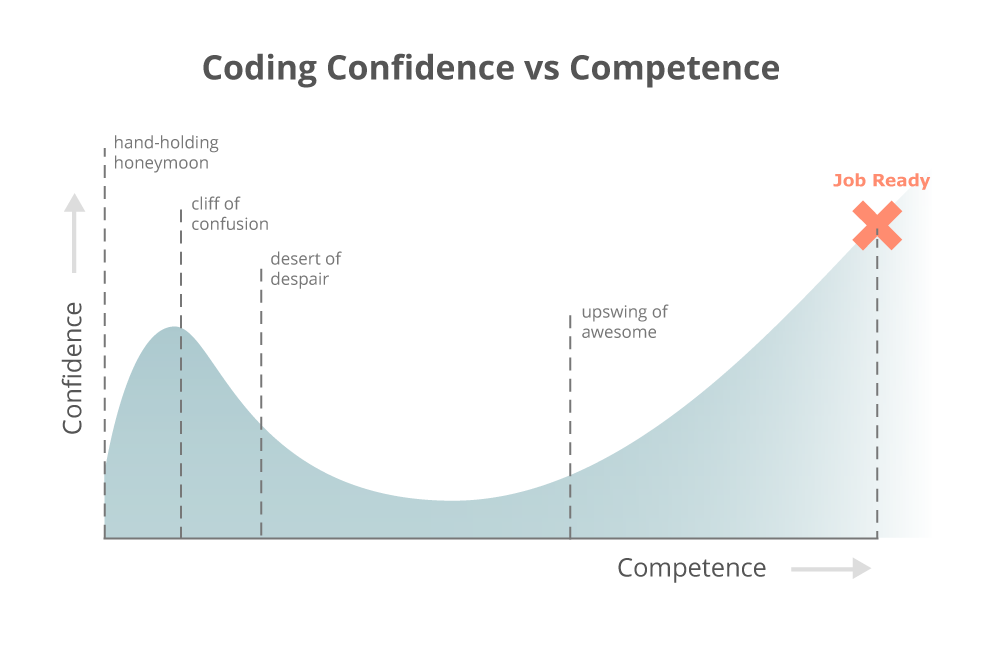
It’s pretty self-explanatory and does an excellent job of charting my own progression with learning to code. Initially, I found myself soaking up the material and making strong headway in CareerFoundry, a remote bootcamp course - it was like bowling with the guard rails up. I sped through the course in a month and half, when it was supposed to take at least three months.
By the end, I understood the ecommerce website I had built and could troubleshoot other students’ issues - mostly by comparing it to my working code and reflecting back on what problems I had.
Nevertheless, I had an excellent grasp of the course material and a solid enough professional background that I applied and was offered a part-time remote position with the bootcamp as a Student Mentor. I was ecstatic that my new career decision was looking optimistic.

But I had no idea what my next steps would be - what to study next. I had a good grasp of how Ruby on Rails worked, but if I was asked to create a web application from scratch, I would’ve said, “I need a few days.” It was with that realization that I started Flatiron School’s Learn Verified program to gain a better foundation in programming.
I’m still progressing through the course, but I find this material to be more comprehensive (it does cost more!). I learned the ins and outs of Ruby - from procedural to object oriented programming and as a result, I gained a deeper understanding of Rails. I even learned about dynamic object relational mapping and frameworks that build upon those concepts.
Then this happened:
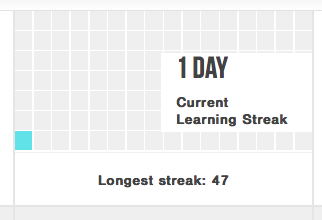
My streak of working on coursework ended at 47 days - keep in mind, this was kept up during the holidays, so it was a pretty big commitment for me to break. The truth was that the pressure of taking on a new venture and not wanting to fail finally caught up with me.

It hit me like a ton of bricks how foreign some of the material was to initially comprehend and how frustrating it was at times to debug incorrect code, never mind the sheer amount of material available to learn. Sometimes, I knew the code was wrong, but I didn’t even know what questions to ask or what to Google. Other times, I was just confused. There were several times when I considered whether I was wrong in attempting to learn programming.
And that’s when I realized that the issue was deeper than coding.
I reflected on the fact that everything is pretty easy to start - introductory material is always simplified and generalized. It’s only when you try to become proficient in an area that you have to learn the intricacies and abstractions that define expertise.
When I first started to learn how to golf, it was fun for a while, trying to whack at a ball. But as I tried to refine my swing and improve my accuracy, the pressure to perform grew, as did the expectation to be better. When it didn’t come quickly, I remember there was a moment in time that I lost interest in it and wanted to pursue another sport. But now, I wouldn’t trade my golf game for any other sport in the world, except maybe sled dog racing across Alaska.
Yes, the journey will undoubtedly get harder as I continue, but my confidence grows as does my experience and proficiency. It would be a lot easier to move on to another goal or quit and start over in something else now that the rosy-colored glasses have come off. But I know that becoming a programmer and making web applications is something I enjoy and want to do. I just have to shamelessly admit that I am not a prodigy at it and commit myself to working hard to becoming a proficient developer.
A fellow Learn student commented that going through the objected oriented exercises reminded her of the song “Ooh Child” by The Five Starsteps, as she saw the letters “OO” so much.
I think it’s a fitting song for all of us to hear, especially when we’re on the cusp of the upswing to awesomeness.
Making a Ruby Gem
January 19, 2016
In this post, I will outline the basic set-up and process to create a gem that displays the air quality in a chosen zipcode of the US. In creating this gem, we need to consider questions like:
Where will we get the data? How will we store this data to show the user? What will the interface for the user look like? What if a zipcode is not recognized by the database? What if information is unavailable?
Let’s begin.
Initialization
As is in the proverbial example of ‘how to make a peanut butter and jelly sandwich’, let me not pass over some assumed steps that have been taken.
We will be using the Nokogiri and Pry gems and Open-Uri to scrape the information from the website that holds the data. More on this later.
The basic file structure for the gem was initialized by running bundle gem [new_gem_name], a very convenient tool available through the magic of Bundler. The structure of our gem will be as follows:
.
├── Gemfile
├── README.md
├── Rakefile
├── bin
│   ├── breathe_in
│   ├── console
│   └── setup
├── breathe_in.gemspec
├── config
│   └── environment.rb
├── lib
│   ├── breathe_in
│   │   ├── city.rb
│   │   ├── cli.rb
│   │   ├── scraper.rb
│   │   └── version.rb
│   └── breathe_in.rb
└── spec
    ├── breathe_in_spec.rb
    └── spec_helper.rb
Scraping Data
The first step is to obtain data. The gem must display: 1.) the expected air quality conditions for today as well as 2.) the current conditions, if available. To gather the data, we will utilize the resources available at AirNow.gov, which is compiled by “the U.S. Environmental Protection Agency, National Oceanic and Atmospheric Administration, National Park Service, tribal, state, and local agencies” - in other words, we can trust the data.
To begin, we can define a simple scraping method inside of our scraper.rb file. The method can be as simple as:
1
2
3
4  def get_page
    doc = Nokogiri::HTML(open("http://airnow.gov/?action=airnow.local_city&zipcode=90101&submit=Go"))
    binding.pry
  end
Notice that we have already input a zipcode and are opening the HTML with Open-Uri’s #open method and getting ready to scrape it with Nokogiri. We will use Pry to experiment with obtaining the correct tags to extract the necessary data. Awesome how powerful that combination is, right??
Now that we have our environment set up, we need to determine what to scrape from the website:
- city name
- today's AQI high (numerical value)
- today's high index (Good, Moderate, etc.)
- current conditions (last updated)
- current AQI conditions (numerical value)
- current conditions index (Good, Moderate, etc.)
After a lot of trial and error that isn’t shown here (like how the chef pulls out a perfectly roasted chicken minutes after preparing it on the cooking channel), we skip ahead to the text values that have been obtained and stripped of unnecessary characters and converted to integers (if applicable) and finally, we end up with six methods that ultimately look like this:
1
2
3
4
5  def self.city_name
    city = scraped_pg.css("#pageContent .ActiveCity")
    #returns array of an object with attributes including city name
    city.empty? ? nil : air_quality[:city_name] = city.text.strip
  end
What’s all the extra logic? Well, we know that sometimes, data can be unavailable for the particular zipcode or the city name doesn’t exist (due to a wrongly inputted zipcode). We will account for that by using the #empty? method and calling it on each Nokogiri result to see if it has returned an empty array instead of meaningful data.
Ultimately, we want to save this extracted data as a hash of attributes that can be assigned to a city, so we will create a class variable called .air_quality_info (saved as a class method called .air_quality). Within this hash, we will assign the attributes with the correctly extracted values for that particular zipcode.
To simplify this, we create a method .city_air_quality that will run all the other extraction methods and returns .air_quality_info, the hash of attributes for the particular zipcode, saved as a class method .air_quality.
1
2
3
4
5
6
7
8
9  def self.city_air_quality
    city_name
    today_high
    index_level
    current_conditions_time
    current_conditions_value
    current_conditions_index
    air_quality
  end
Also, we want to add meaning to the ‘index’ words (Good, Moderate, etc.) that we pull from the website, so we will create a few methods that prints the relevant health information. We might as well include a method that outlines detailed information about the numerical range for the AQI value.
1
2
3
4
5
6
7
8
9
10
11
12  def self.index_good
    print "Air quality is considered satisfactory, and air pollution poses little or no risk."
  end

  etc..

  def self.AQI_range_information
    information = <<-Ruby
      The Air Quality Index (AQI) translates air quality data into an easily understandable number to identify how clean or polluted the outdoor air...
      Ruby
    ...
  end
One more thing: we will refactor the #get_page method to take in an argument (since we will be inputting the zipcode that the user types) and pass it into the website address through string interpolation.
1
2
3
4
5  def self.scraped_page(zipcode)
    begin
      @@scraped = Nokogiri::HTML(open("http://airnow.gov/?action=airnow.local_city&zipcode=#{zipcode}&submit=Go"))
    ...
  end
We will further refactor this and assign this Nokogiri request as a class variable (.scraped) to make our scraping methods less cluttered.
Special Consideration
You may notice a method at the bottom of the file called .under_maintenance.
1
2
3  def self.under_maintenance #returns true if under maintenance
    scraped_pg.css("#pageContent .TblInvisibleFixed tr p[style*='color:#F00;']").text.include?("maintenance")
  end
The AirNow.gov website undergoes maintenance every day from 12am-4am EST and data can be sporadically available. I will talk more about this later when we get to the CLI, but know that it exists.
Making a City
Great, we have now established a class that scrapes the data. Next, we need to create a City class that will hold the scraped data.
1
2
3
4  def initialize(city_hash={})
    city_hash.each { |key, value| self.send(("#{key}="), value) }
    @@cities << self
  end
Every new city will be initialized with a default empty hash, but if a hash is passed in, the city object will be assigned with the respective hash keys and values using the #send method. Also, every new instance of a city will be pushed into a class variable called .cities that will hold all created cities.
1
2
3  def add_city_air_quality(air_quality_hash)
    air_quality_hash.each { |key, value| self.send(("#{key}="), value) }
  end
The other important method to note in this file is the #add_city_air_quality method that takes in a hash. For our use, this method takes in the hash of attributes that we created in the Scraper class (.air_quality_info) and assigns these attributes to the city instance. So after this method is run, each city will have a :city_name, :today_high, :today_index, :last_update_time, :last_update_value, and :last_update_index (if the values are not nil). It will also have a :zipcode attribute that gets passed in through our CLI, but more on that later.
Putting It All Together
We have scraped the necessary data and now have the ability to assign a city with this data. How do we do this? With a CLI class, of course! Open up cli.rb to see the magic.
Let’s begin with a broad overview to understand the objective of this class. What we want to do:
- Greet the user and ask for a zipcode
- Scrape the website with that zipcode
- Assign the scraped attributes to a city
- Display the information
- Ask the user if they want to search another zipcode, get AQI information, or exit
Let’s break it down by evaluating the control flow of the class.
1
2
3
4
5
6
7
8  def run
    puts "*Data provided courtesy of AirNow.gov*"
    puts "How safe it is to breathe today?"
    puts ""
    get_information
    check_site_availability
    menu
  end
First, the CLI will be started with the #run method, which initially greets the user with a couple of puts statements.
Then the #get_information method will be invoked.
1
2
3
4
5
6
7
8
9
10
11
12  def get_information
    get_zipcode
    scrape_data
    if BreatheIn::Scraper.city_name == nil
      puts "That zipcode is not recognized by Air.gov."
      get_information
    else
      new_city = BreatheIn::City.new({zipcode: self.class.zipcode})
      assign_attributes(new_city)
      display_information
    end
  end
In turn, this method invokes the #get_zipcode method, which will save the user inputted zipcode in a class variable .zipcode that will be referenced in several other methods.
1
2
3
4
5
6
7
8
9  def get_zipcode
    input = ""
    until input.match(/\b\d{5}\b/)
      puts "Please enter a valid zipcode and wait a few seconds:"
      puts ""
      input = gets.strip
    end
    @@zipcode = input.to_s.rjust(5, '0')
  end
After getting a valid zipcode, #get_information will invoke #scrape_data, which will actually call on the #scraped_page method in the Scraper class. .zipcode will be passed into this method and through string interpolation, AirNow.gov will load the relevant data for that zipcode.
1
2
3  def scrape_data
    BreatheIn::Scraper.scraped_page(self.class.zipcode)
  end
Next in the control flow is a conditional statement that checks if the #city_name method is nil.
1
2
3
4
5
6  def get_information
    ...
    if BreatheIn::Scraper.city_name == nil
      puts "That zipcode is not recognized by Air.gov."
      get_information
    ...
In essence, this weeds out zipcodes that are valid zipcodes, but are not recognized by AirNow.gov.
1
2
3
4
5
6
7
8  def get_information
    ...
    else
      new_city = BreatheIn::City.new({zipcode: self.class.zipcode})
      assign_attributes(new_city)
      display_information
    end
  end
Else, if there is indeed data available for the zipcode, a new city instance will be initialized with a hash of the zipcode value.
This newly created city will now be assigned the attributes that we scraped in the #scrape_data method, by calling on the #assign_attributes method.
1
2
3
4  def assign_attributes(new_city)
    attributes = BreatheIn::Scraper.city_air_quality
    ...
  end
#assign_attributes takes in an argument of the new city object that was just created - more on this in a second. But first, this method will call on #city_air_quality in the Scraper class - which scrapes the relevant data from the website and creates a hash of attributes from it.
1
2
3
4
5
6
7
8
9  def assign_attributes(new_city)
    ...
    attributes[:today_high] = "Data currently unavailable." if !attributes.has_key?(:today_high)
    attributes[:today_index] = "Data currently unavailable." if !attributes.has_key?(:today_index)
    attributes[:last_update_value] = "Data currently unavailable." if !attributes.has_key?(:last_update_value)
    attributes[:last_update_time] = "Data currently unavailable." if !attributes.has_key?(:last_update_time)
    attributes[:last_update_index] = "Data currently unavailable." if !attributes.has_key?(:last_update_index)
    ...
  end
Data from AirNow.gov is intermittently unavailable for certain zipcodes, certain time periods, and sometimes, random system glitches. These conditional statements check to see if the data for each scraped value of the city object is nil and if it is, assigns that key a string statement. It must check every possible hash key because not every value is nil at the same time. Without this logic, a nil data value will be populated with the previous search’s results.
1
2
3
4  def assign_attributes(new_city)
    ...
    city_info_hash = new_city.add_city_air_quality(attributes)
  end
Finally, the #add_city_air_quality method from the City class will be invoked on the city object, new_city, passing in the scraped data hash. As a result, the city will now be associated with a hash of attributes.
1
2
3
4
5
6
7
8
9
10
11
12
13
14
15
16  def display_information
    BreatheIn::City.cities.each do |city|
      puts "---------------------"
      puts "City/Area: #{city.city_name}, Zipcode: #{city.zipcode}"
      puts "---------------------"
      puts "Today's High AQI: #{city.today_high}"
      puts "Today's Index: #{city.today_index}"
      health_description(city.today_high) if city.today_high.is_a?(Integer)
      puts "---------------------"
      puts "Last #{city.last_update_time}"
      puts "Current AQI: #{city.last_update_value}"
      puts "Current Index: #{city.last_update_index}"
      health_description(city.last_update_value) if city.last_update_value.is_a?(Integer)
       puts "---------------------"
    end
  end
Finally, the information will be displayed through the #display_information method. This method iterates through the .cities class variable and puts out the information.
This method also calls on #health_description, which will evaluate the value of :today_index and :last_update_index and return the relevant health message.
1
2
3
4
5
6
7
8
9
10
11
12
13
14
15  def health_description(level)
      if level.between?(0,50)
        puts "#{BreatheIn::Scraper.index_good}"
      elsif level.between?(51,100)
        puts "#{BreatheIn::Scraper.index_moderate}"
      elsif level.between?(100,150)
        puts "#{BreatheIn::Scraper.index_sensitive}"
      elsif level.between?(151,200)
        puts "#{BreatheIn::Scraper.index_unhealthy}"
      elsif level.between?(201,300)
        puts "#{BreatheIn::Scraper.index_very_unhealthy}"
      elsif level.between?(301,500)
        puts "#{BreatheIn::Scraper.index_hazardous}"
      end
  end
Going back to the control flow, the gem has executed #get_information and returns to #run. The next method #check_site_availability is invoked. This method calls on #under_maintenance in the Scraper class to check if there is a maintenance message present on the page. If so, it will print a disclaimer notice to the user.
1
2
3
4
5
6
7
8
9  def check_site_availability
    if BreatheIn::Scraper.under_maintenance
      disclaimer = <<-Ruby
        ***AirNow.gov undergoes maintenance from midnight to 4am EST.
        If information is currently unavailable, please try again later.***
        Ruby
      puts disclaimer
    end
  end
The last method to be called is #menu, which will display a pretty self-explanatory list of the user’s next choices after one search.
1
2
3
4
5
6
7
8
9
10
11
12
13
14
15
16
17
18
19
20
21
22
23
24
25
26  def menu
    input = nil

    while input != 3
      puts ""
      puts "1. Learn more about the AQI values and the ranges."
      puts "2. Choose another zipcode."
      puts "3. Exit."
      puts "Please make a selection:"
      puts ""

      input = gets.strip.to_i
      case input
        when 1
          BreatheIn::Scraper.AQI_range_information
        when 2
          BreatheIn::City.reset
          get_information
          check_site_availability
        when 3
          puts "Breathe safely!"
        else
          puts "Please choose 1, 2, or 3."
      end
    end
  end
One note: when the user decides to perform another search, the .cities array class variable will be cleared, as otherwise, the previous results will be listed as well.
There you have it! Use this gem every morning to see how toxic that outside air really is. Maybe you’ll find out that on some days, it isn’t better for your health to get off that computer and run around outside for a bit.
View the GitHub repository for this gem.
Unwinnable Strategy
January 10, 2016
There are many strategies to implement an unbeatable AI in a zero-sum game like tic-tac-toe, including using the minimax algorithm. Solely for entertainment, I will explain an alternative strategy that might not be as fool-proof, but will get the job done.
The minimax algorithm involves making a move by calculating the best payoff for every move. Subsequently, the best move for the second player is the opposite of the first move. In tic-tac-toe, the most important move that must be calculated correctly is when there are two spots of a winning combination taken by the same player. How must the potentially winning player react? How must the potentially losing player react? What does this look like in code?
First, let’s start from the beginning and examine all of the possible moves for the AI. This Quora question on tic-tac-toe strategies does an excellent job of explaining this.
Through it, we are able to deduce the following possible moves of an AI:
Board:
1 | 2 | 3
~~~~~~~
4 | 5 | 6
~~~~~~~
7 | 8 | 9
- Center move (5)
- Corner move (1, 3, 7, 9)
- Edge move (2, 4, 6, 8)
Let’s write the code for these moves!
Center of the universe.
A center move is as simple as writing a method that determines if the center spot is taken and if it isn’t, to take that spot.
1
2
3  def move(board)
    5 if !board.taken?("5")
  end
* Just FYI, I’m utilizing code from other parts of my program and passing in a board argument that is an array of empty cells and utilizing a method #taken that determines if the spot is already filled. I will cover the entirety of my tic-tac-toe game in a subsequent post.
Boxed into a corner.
This method will choose a corner spot at random, as long as it hasn’t been taken.
1
2
3
4  def corner_move(board)
    corners = [0,2,6,8] #remember, arrays are zero based
    corners.shuffle.detect { |spot| !board.taken?(spot+1) } #the +1 is necessary as valid inputs are numbers 1-9
  end
On the edge.
An edge is always bordered by two corners and thus, this method chooses an edge spot at random.
1
2
3  def edge_move(board)
    [1,3,5,7].shuffle.detect { |spot| !board.taken?(spot+1) }
  end
And just like that, we have declared all possible moves on the board for the AI. The hard part is instilling logic into making the best move.
One more move to win!
Going back to the original discussion, the AI must determine if there is a winning combination that must be utilized or blocked. A winning combination can be any one of these arrays:
WIN_COMBINATIONS = [
    [0,1,2],
    [3,4,5],
    [6,7,8],
    [0,3,6],
    [1,4,7],
    [2,5,8],
    [0,4,8],
    [6,4,2]
  ]
So ideally, we would like the AI to check each potentially winning combination and determine if two of the three spots are already filled.
The pseduo-code (more code than ‘pseduo’) would look like this:
1
2
3
4
5
6
7  def open_spot
    Game::WIN_COMBINATIONS.detect do |spot|
      (spot[1] == taken && spot[2] == taken && spot[3] == free) ||
      (spot[2] == taken && spot[3] == taken && spot[1] == free) ||
      ((spot[3] == taken && spot[1] == taken && spot[2] == free))
    end
  end
In this method, we are checking each winning combination to see if any two out of the three spots are taken. If no such combination exists, the method will return nil.
However, we must bear in mind that it actually matters whether the spots are taken both by “X” or taken both by “O” (in other words, a winning combination is defined by all “X”s or all “O”s). So we must first assign a ‘token’ to each player:
1
2
3  def opp_token  #this method assigns the correct token for the AI's opponent based on the AI's token
    ( self.token == "X" ? "O" : "X")
  end
Taking into account this new information, we produce this marvel of coding:
1
2
3
4
5
6
7  def open_spot(board, token)
    Game::WIN_COMBINATIONS.detect do |spot|
      ((board.cells[spot[0]] == token && board.cells[spot[1]] == token) && !board.taken?(spot[2]+1)) ||
      ((board.cells[spot[1]] == token && board.cells[spot[2]] == token) && !board.taken?(spot[0]+1)) ||
      ((board.cells[spot[2]] == token && board.cells[spot[0]] == token) && !board.taken?(spot[1]+1))
    end
  end
So now we have a method that determines if there are two “X”s (or “O”s) in a potentially winning combination on the current board.
For the win! For the block!
Here is the kicker: it doesn’t matter if the two spots are both “X”s or both “O”s, the next move of the AI is to take that empty third spot.
Huh? Let’s see an example.
Board:
| X | O
~~~~~~~~
| O |
~~~~~~~~
| X |
It is X’s turn and it will move into that bottom left spot to block the win for O.
Board:
X | |
~~~~~~~~
| X | O
~~~~~~~~
O | |
It is X’s turn and it will move into that bottom left spot to win the game. No matter whose tokens are in the winning combination, the AI must put their token in that third spot.
Makes sense? We can now create a method that will utilize the previous methods to find the third spot of the winning combination that isn’t yet taken:
1
2
3
4
5
6
7  def win_or_block(board)
    if open_spot(board, self.token)  # if the winning combination is the AI's tokens, it will go for the win
      open_spot(board, self.token).detect { |index| !board.taken?(index+1) }
    elsif open_spot(board, self.opp_token) # else, if the winning combination is the AI's opponent's token, it will go for the block
      open_spot(board, self.opp_token).detect { |index| !board.taken?(index+1) }
    end
  end
This method will return a number between 1 and 9 that will either win the game or block an opponent’s win.
Putting it all together now.
Now we have methods for a center move, corner move, edge move, and a move to win/block a winning combination.
Based on the above strategy provided by the Quora question, we can implement something like this:
1
2
3  def possible_move(board)
    5 || win_or_block(board) || corner_move(board) || edge_move(board)
  end
So the AI will always choose this conditional sequence of moves and be truly unbeatable!
Yield!
January 3, 2016
The yield statement provides a more in-depth look at what happens when enumerators like #each and #collect are used. These methods are used on arrays and iterate through the collection, applying code contained in the block to each element.
Yield is especially powerful because it can take parameters and pass in data as an argument to the code in the block to execute it. To call a method with a yield statement that takes parameters, the method is invoked with an argument and a block that includes the code we want to apply to each yielded value that is passed in.
An example:
1
2
3
4
5
6
7
8
9
10
11
12
def animals(array)
i = 0
until i >= array.length
yield (array[i])
i += 1
end
array
end
animals(['dog', 'cat', 'bear', 'tiger']) do |x|
puts "I have a #{x} in my backyard."
end
1
2
3
4
5
> I have a dog in my backyard.
> I have a cat in my backyard.
> I have a bear in my backyard.
> I have a tiger in my backyard.
=> ["dog", "cat", "bear", "tiger"]
We have the #animals array that will iterate over the collection using an until loop and a yield statement. This method is called on line 10, passing in an argument with the array [‘dog’, ‘cat’, ‘bear’, ‘tiger’]. Notice, a block is also passed in with it:
{ |x| puts "I have a #{x} in my backyard." }
When the method is invoked, the array will be passed into the until loop as it arrives at line 4, the yield statement: yield (array[i]). The control flow will go from line 4 to line 11, as the yield statement will take each element of the array and pass it into the block that was originally called with the #animals method. Then, the control flow returns to line 5, as the iteration increases by one element.
An until (or while) loop will always return nil, so in order to return the original array, we include it on line 7. Of course, if you want to return a modified array, an empty array must first be created and the iterations must be pushed into this modified array and returned on the last line.
Useful!
git revert vs. git reset
December 20, 2015
I previously wrote about two different methods to rollback a database migration file. In this entry, I will explain two different methods to undo commits made to your application.
Groundwork:
$ git log --oneline
- This will show an abbreviated list of all recent commits made. The unique ID in front (the "hash" or "SHA") will be needed to undo any commits.
Situation 1: The commit has already been uploaded with $ git push.
$ git revert <SHA>;
- This will create a new commit that reverses all the additions and deletions done in that particular <SHA> commit.
Example:
1
2
3
4
5
6
7
My-Macbook:railsapp HomeUser$ git log --oneline
684ba64 edit README file
8bcd79c add skills, portfolio, and about sections
af0a023 navbar creation
bd1b6a4 add responsive intro screen
42d6aa8 first commit
My-Macbook:railsapp HomeUser$ git revert 684ba64
1
2
3
4
5
6
7
8
9
10
11
12
13
Revert "edit README file"
This reverts commit 684ba647629bdfd2e0c31216b13fb51673a0c0af.
# Please enter the commit message for your changes. Lines starting
# with '#' will be ignored, and an empty message aborts the commit.
# On branch master
# Changes to be committed:
# modified: README.rdoc
#
~
~
"~/Desktop/railsapp/.git/COMMIT_EDITMSG" 10L, 304C
The second code block shows the VIM editor in which the message on the new commit can be modified. Simply type “a” to append the message, edit the message, push “esc” when done, and then type “:exit” to save the changes and to commit the changes. More about VIM Editor commands here.
Afterwards, run $ git push to update the new commit, keeping the mistaken commit in the history.
Situation 2: Removing local commits that have not been pushed.
$ git reset --hard <SHA>;
- This will undo any changes made to the working directory and rewind your application back to the specific <SHA>. It will also delete any commits made after the specific <SHA>.
Example:
1
2
3
4
5
6
7
8
9
10
11
12
My-Macbook:railsapp HomeUser$ git log --oneline
684ba64 edit README file
8bcd79c add skills, portfolio, and about sections
af0a023 navbar creation
bd1b6a4 add responsive intro screen
42d6aa8 first commit
My-Macbook:railsapp HomeUser$ git reset --hard af0a023
HEAD is now at af0a023 navbar creation
My-Macbook:railsapp HomeUser$ git log --oneline
af0a023 navbar creation
bd1b6a4 add responsive intro screen
42d6aa8 first commit
More information on undoing changes to your repository can be found at the GitHub website, including how to redo your undos.
Heroku: deploying in multiple environments
December 8, 2015
A common question comes up on how to deploy the same app to two different remote repositories on Heroku - for instance, a “staging” remote and a “production” remote.
Creating two remotes from scratch:
$ heroku create --remote staging$ heroku create --remote production
This will create two separate heroku apps, each one linked to a git remote namedstagingand one namedproduction.
1
2
3
4
$ heroku create --remote staging
Creating arcane-river-5903... done, stack is cedar-14
https://arcane-river-5903.herokuapp.com/ | https://git.heroku.com/arcane-river-5903.git
Git remote staging added
1
2
3
4
$ heroku create --remote production
Creating stormy-earth-1976... done, stack is cedar-14
https://stormy-earth-1976.herokuapp.com/ | https://git.heroku.com/stormy-earth-1976.git
Git remote production added
(To push your app to the arcane-river-5903 app, run $ git push staging master)
(To push your app to the stormy-earth-1976 app, run $ git push production master)
1
2
3
4
5
$ git remote -v
production https://git.heroku.com/stormy-earth-1976.git (fetch)
production https://git.heroku.com/stormy-earth-1976.git (push)
staging https://git.heroku.com/arcane-river-5903.git (fetch)
staging https://git.heroku.com/arcane-river-5903.git (push)
Copying an existing remote to a new remote:
$ heroku fork --from existingappname --to newappnameThis will copy all of the config vars, add-ons and Postgres data to the new app.
1
2
3
4
5
6
7
8
9
10
11
12
13
14
15
$ heroku fork --from limitless-anchorage-9300 --to desolate-plateau-9726
Forking limitless-anchorage-9300... done. Forked to desolate-plateau-9726
Setting buildpacks... done
Deploying 3072e33 to desolate-plateau-9726... done
Adding addon heroku-postgresql:hobby-dev to desolate-plateau-9726... done
Transferring DATABASE to DATABASE...
Progress: done
Copying config vars:
LANG
RAILS_ENV
RACK_ENV
SECRET_KEY_BASE
RAILS_SERVE_STATIC_FILES
... done
Fork complete. View it at https://desolate-plateau-9726.herokuapp.com/
$ heroku git:remote -a newappname -r gitremotenameThis will create a new git remote (production) that links to the new app (desolate-plateau-9726).
1
2
$ heroku git:remote -a desolate-plateau-9726 -r production
set git remote production to https://git.heroku.com/desolate-plateau-9726.git
- Note: If you want to change that remote to be “staging” instead of “heroku”, here is one simple method:
$ git remote rm heroku$ heroku git:remote -a limitless-anchorage-9300 -r staging
Installing Heroku
November 23, 2015
Heroku is an excellent cloud service to deploy your Rails application. It provides the database server for your application and is extremely easy to use. I’ve provided detailed instructions on how to successfully install Heroku.
###1. Edit the Gemfile###
Heroku runs on a PostgreSQL server (unlike how “sqlite3” is run in the development environment) and this must be updated in the production environment of the Gemfile with the ‘pg’ gem. Update your gem file:
1
2
3
4
group :production do
gem 'pg'
gem 'rails_12factor'
end
Regarding rails_12factor:
“rails_12factor makes your [Rails 4] app compliant with a 12factor provider…” (source)
###2. Run $ bundle install###
This will properly install all the gems and dependencies that are located inside the Gemfile and make them available to the application.
###3. Further production environment edits (recommended)###
Within the file /config/environments/production.rb, make these changes:
1
2
3
4
5
6
#Find these lines and set them to the values below:
config.serve_static_files = true
config.assets.compile = true
#Find this line and uncomment it, just like below:
config.action_dispatch.x_sendfile_header = 'X-Accel-Redirect' # for NGINX
The first set of lines will “allow Heroku to serve and compile static files” like images. Read more about X-Sendfile headers here.
###4. Commit your changes###
Run:
$ git add .
$ git commit -m "Install Heroku"
to update the changes you’ve made so far to the Gemfile and the production.rb files.
###5. The Heroku Toolbelt###
Make a Heroku account if you haven’t done so already. Next, download the Heroku Toolbelt so that you can use the Heroku Command Line Interface (CLI).
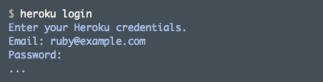
###6. Run $ heroku login###
In your terminal, run the command and follow the prompts to login and utilize the heroku command.
- image courtesy of Heroku
###7. Run $ heroku create from within your project directory###

- image courtesy of Heroku
This will create a new empty project on Heroku and also a git remote that links your app to Heroku.
###8. Run $ git push heroku master###
Push your changes to Heroku.
###9. Run $ heroku run rake db:migrate###
Update the application database on Heroku.
###10. Confirm Heroku has been successfully integrated to your app###
Run $ git remote -v to see that a git remote named heroku exists with the correct url of your app on Heroku.
Troubleshooting: If your git remote points to the wrong app on Heroku, use these commands to update your git remote.
To remove the old remote, run: $ git remote rm heroku
To update the remote, run: $ heroku git:remote -a appname
(In the example above, the appname would be: polar-inlet-4930)
Rename the GitHub repository
November 19, 2015
Your initial repository name may no longer be applicable or you simply desire to change it. This is a very easy process to do.
1. Navigate to the Settings section of your repository on GitHub and rename your repo.
2. Update the remote location origin to the new repository name by running:
$ git remote set-url origin https://github.com/user-name/new-repo-name.git
3. Verify that the change has been made by running:
$ git remote -v
Bonus! For Heroku:
Renaming an app on Heroku is as easy as running a single command from the CLI. From within your project directory, run:
$ heroku apps:rename newappname
db:rollback vs. db:migrate:down
November 14, 2015
It happens every once in a while - the database table is set up incorrectly in the migration file and you don’t realize it until later. Or maybe you simply need to edit the database table based on updated information. Read on:
Problem:
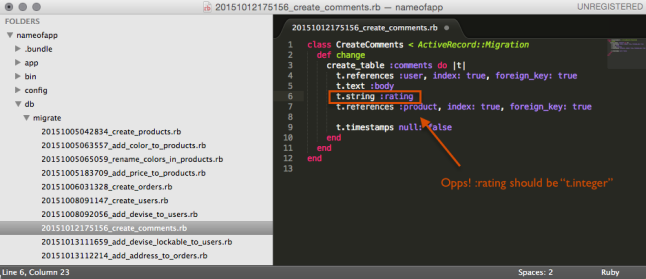
:rating is incorrectly identified in the comments database table as a string when it should be an integer
Solution A: db:rollback
To rollback the latest migration file, you can run:
$ rake db:rollback
However, this will only roll back the latest migration file. In our example, two more migration files were run after 20151012175156_create_comments.rb (the target migration file). Instead, use this command:
$ rake db:rollback STEP=3
STEP=3 rolls back the database 3 migration files to the target migration file that we desire. However, this will rollback the migrations that happened after the target migration as well. This can be good or bad - it is useful if you ran migration files after the target migration that you no longer need and want to undo. In this case, we won’t touch those other migration files.
Solution B: db:migrate:down version=
This is probably the better method to edit a target migration file, as it only rolls back the target migration file. Since we want to edit 20151012175156_create_comments.rb, run:
$ rake db:migrate:down version=20151012175156
where version is equal to the numbers (composed of date and time) located at the beginning of your migration file.
Whichever solution you choose, edit the migration file by changing “t.string” to “t.integer” and then run:
$ rake db:migrate
to update your database and finish. (In this example, Solution A will run the two migration files after the target migration file as well, while Solution B will only run the target migration file.)
Alternative Solution: run a new migration file
Instead of the potential anxiety that comes with having to edit history, you can run a new migration file to update the type cast of the :rating field in the comments table by dropping and re-adding the comments table. Run:
$ rails generate migration UpdateTypeCastOfRatings
This will create an empty migration file in which you can cleanly drop the old table from the database and add it again by copying and pasting the contents of the original target migration file to this new migration file. Your new migration file should look like this:
1
2
3
4
5
6
7
8
9
10
11
12
13
14
class UpdateTypeCastOfRatings < ActiveRecord::Migration
def change
drop_table :comments
create_table :comments do |t|
t.references :user, index: true, foreign_key: true
t.text :body
t.string :rating
t.string :integer
t.references :product, index: true, foreign_key: true
t.timestamps null: false
end
end
end
Make sure to run $ rake db:migrate to update your database.
If you don’t want to drop the entire table and create it again, you can use the change_column migration method on :rating. If interested, read more about this method.
Looking back at my CareerFoundry Experience
November 7, 2015
In the short time that I’ve gone through CF, I’ve learned how to create my own portfolio website and an e-commerce website from scratch using multiple programming languages, frameworks, and libraries. Maybe you’re just starting the journey and downloading Sublime Text for the first time ever or maybe you’re on exercise 58 and thinking, “When is this exercise going to end??” Wherever you are in the course, I wanted to share some insights with you that I’ve gleaned in my time at CF that I hope will help you now and in the future.
“Have a plan of action.”
This was my approach for every lesson:
- Read the "Learning Goals" at the top
- Skim the exercise, focusing on the section titles
- Read the "Task" section once
- Go back and complete the lesson
In the beginning, this was hard to do because of an overwhelming anxiety that I didn’t understand half the words in the “Learning Goals” and the “Task” section. I thought to myself, “There’s no way I’m going to know how to do that.”
But this approach got easier to do as the exercises went by and I built up confidence that I’ve gotten through it before and I could do it again. On a road trip, you save gas when you know where you’re heading. Even though you might not understand a single word on the initial skimming, your brain still processes the words and makes them familiar to you.
“It’s all in the details.”
There are two moments when you have to be particularly diligent in completing the exercises. The first time is in reading the directions/instructions on how to complete a certain action. Misinterpret or skip a line of instruction and you can find yourself heading down a slippery slope of compounding mistakes.
The other time is in actually writing the code. “Read twice, write once” applies here. Syntax errors (missing brackets, semicolons, a <div>, ‘end’, etc.) can waste an unbelievable amount of time as you rack your brain to find the holy grail of a solution when the answer was the simple absence of a closing bracket.
One more note on reading and details: Some of the lessons require you to read documentation (installation guides, ‘readme’ files, ‘how-to’ guides, usage examples, etc.) to do some of the exercises. Some are better written and more detailed than others. Nevertheless, always pay attention to the provided instructions - “read twice, install/implement once”. Some of the coding doesn’t always make sense initially, but keep at it. Coding isn’t like learning a new language, but it is like learning a new dialect. You just have to repeatedly expose yourself to the terminology and it’ll become a natural part of your vocabulary.</p></section>
“I’m going to throw my computer across the room.”
By the end of the course, I realized I had probably spent an equal (if not more) amount of time figuring out why a certain piece of code wouldn’t work in my application as I did writing actual code.
But don’t let the frustrations and hopelessness get the best of you – there’s always an answer to your problem, you just have to find it. I will try to list the process that I used to resolve most of my problems (and leave out the bouts of computer-screen-punching stress that occurred in between) – significant steps are in bold:
- Problem? Uh-oh. Take a deep breath.
- Look for any syntax errors.
- Re-read directions/instructions.
- Run the code again.
- Accept Einstein’s definition of insanity as doing the same thing over and over, expecting different results.
- Remove the added code and reload your website to see if it runs the same as before you added the new coding (to make sure there weren’t any accidental inserts or deletions elsewhere)
- Look for any error messages in the logs, output, console, view, etc.
- Ask yourself, “What am I trying to do?”
- On each piece of added code, ask yourself, “How does this piece of code add to what I’m trying to do?”
- Ask yourself, “Does this piece of code do what it’s supposed to be doing?” (congratulations, you’re debugging!)
- Take to Google and search using any error messages or “how do you do this” or “this isn’t working”.
- Talk to your mentor.
Something to consider: If all else fails, take a short break and step away from your computer. Your brain is still working in the background and stepping away can bring a new perspective or understanding to the problem.
Keep in mind that the solutions and tutorials you find online (like on Stack Overflow) won’t always have the exact answer you need. Try to read the solutions and think about how and why that’s the solution, instead of “what do I type?” More often than not, the solutions will introduce new concepts or be very complex – but don’t shy away, Google the new terms and continue expanding your knowledge base.
I purposely put talking to your mentor as the last step in this process because it’s really easy to just open up that direct message on Slack and ask away. But I truly believe you will get a lot more out of this course if you resist that initial desire and instead, try to resolve the problem using critical-thinking skills. Don’t get me wrong – mentorship is one of the highlights of CF and the Slack community is great. But don’t sell yourself short and take the time to give yourself the opportunity to struggle and strive to learn – just reach out before you get to the computer-screen-punching point of no return.
“My Final Thoughts.”
I didn’t know what to expect when I first started at CF. Throughout the course, there were rough patches where I thought to myself, “I can’t do this. I’m not cut out for coding.” At times, it felt like my knowledge base was a fragile house of cards that crumbled every time under the pressure of irreconcilable margins/padding to the dreaded ‘undefined method for nil:NilClass” error. But I fought through the deepest moments of hopelessness and I was able to successfully complete every task in every exercise.
I never had a twitter account, but I was recommended to get one by my mentor. My first twitter post was a quote by Leonard Nimoy that I expressed through a ruby method (I know, major nerd move on so many levels). He said, “Logic is the beginning of wisdom.” Programming is all about applying logic and I truly believe that as CF students learning to code, we’re not just more intelligent, but we are all wiser people for it. Good luck everyone!